Assign a License
In order to assign a CRM license to a user, we know that one should login into the O365 Portal using an O365 admin account and then go to the list of users and then provide a CRM license manually to the user as shown below
Let's see how to do the same task using PowerShell. For those who are new to PowerShell in O365, please check out my introduction article Introduction to PowerShell using O365
Once you have the Azure PowerShell window open, the following command will easily assign the CRM license to a user
License Options
The above code will assign all the license options under Dynamics CRM to the user. What is a license option?
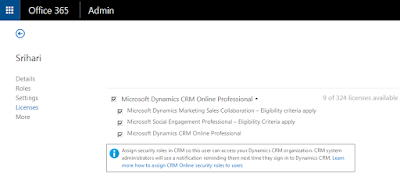
In the below screenshot, a Dynamics CRM license has 3 License options:

Well, what if we just want to assign ONLY the 3rd license option (Microsoft Dynamics CRM Online Professional) and not assign the other two?
In that case, our code needs to be updated as below.
First, we need to retrieve the license options schema name for CRM using the code below
Results:
Great, now that we know the schema names of the different license options under the CRM license, we will create a LicenseOption variable and add these license plans as "Diabled Plans" for that license
Finally, the complete code to assign a license to a user with ONLY the CRM license option enabled would look like
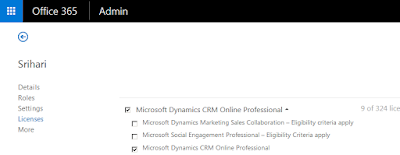
That's it! ..this is how it would now appear from the O365 UI
Removing a License
Removing a license is very straightforward as well. The following line of code will remove the license from a user
In order to assign a CRM license to a user, we know that one should login into the O365 Portal using an O365 admin account and then go to the list of users and then provide a CRM license manually to the user as shown below

Let's see how to do the same task using PowerShell. For those who are new to PowerShell in O365, please check out my introduction article Introduction to PowerShell using O365
Once you have the Azure PowerShell window open, the following command will easily assign the CRM license to a user
Connect-MsolService

Set-MsolUserLicense -UserPrincipalName "srihari@testinc.onmicrosoft.com" -AddLicenses "testinc:CRMSTANDARD"
License Options
The above code will assign all the license options under Dynamics CRM to the user. What is a license option?
In the below screenshot, a Dynamics CRM license has 3 License options:
- Microsoft Dynamics Marketing Sales Collaboration
- Microsoft Social Engagement Professional
- Microsoft Dynamics CRM Online Professional

Well, what if we just want to assign ONLY the 3rd license option (Microsoft Dynamics CRM Online Professional) and not assign the other two?
In that case, our code needs to be updated as below.
First, we need to retrieve the license options schema name for CRM using the code below
Connect-MsolService

Get-MsolAccountSku | Where-Object {$_.SkuPartNumber -eq "CRMSTANDARD"} | ForEach-Object {$_.ServiceStatus}
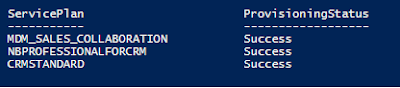
Results:

Great, now that we know the schema names of the different license options under the CRM license, we will create a LicenseOption variable and add these license plans as "Diabled Plans" for that license
$CRMLicense = New-MsolLicenseOptions -AccountSkuId testinc:CRMSTANDARD -DisabledPlans MDM_SALES_COLLABORATION, NBPROFESSIONALFORCRM
Finally, the complete code to assign a license to a user with ONLY the CRM license option enabled would look like
Connect-MsolService

# To find the additional service options that get enabled when assigning the CRM License, please use the code below to check
# Get-MsolAccountSku | Where-Object {$_.SkuPartNumber -eq "CRMSTANDARD"} | ForEach-Object {$_.ServiceStatus}

#Results
#-----------------------------------------------------------------------------
# MDM_SALES_COLLABORATION = Microsoft Dynamics Marketing Sales Collaboration
# NBPROFESSIONALFORCRM = Microsoft Social Engagement Professional
#-----------------------------------------------------------------------------

#Create the License Options with the Disabled Service Plans
$CRMLicense = New-MsolLicenseOptions -AccountSkuId testinc:CRMSTANDARD -DisabledPlans MDM_SALES_COLLABORATION, NBPROFESSIONALFORCRM

Set-MsolUserLicense -UserPrincipalName "srihari@testinc.onmicrosoft.com" -AddLicenses "testinc:CRMSTANDARD" -LicenseOptions $CRMLicense
That's it! ..this is how it would now appear from the O365 UI

Removing a License
Removing a license is very straightforward as well. The following line of code will remove the license from a user
Set-MsolUserLicense -UserPrincipalName "srihari@testinc.onmicrosoft.com"-RemoveLicenses "testinc:CRMSTANDARD"
No comments:
Post a Comment