Thursday, January 28, 2016

Bulk Assign/Remove CRM Licenses using PowerShell and O365

This is the third article in the series of using PowerShell with O365 and CRM. The first article was an Introduction To PowerShell Using O365.html and the second one was Assign or Remove a CRM license to a user using PowerShell in O365  In this article, we will be taking this one step further and

  • Assigning/Removing CRM licenses in bulk by reading from a file
  • Add error handling logic when assigning licenses
  • Output the results to the command prompt and prompt the user if he/she wishes to export the results.
  • Export the results out into csv file along with any error reasons for further reference and troubleshooting
First, we will create a file with the list of users that need to be assigned with a CRM license. Please note that in order to assign a license to a user, we need to obtain the UserPrincipalName of the user. This is generally of the format username@domainname.com. Below is the format of the file that I have used. I will call this file "Users.txt"


Bulk Assign Licenses

Now, let's launch PowerShell ISE and get started with the code to assign licenses to the above users. Obviously, before we assign a license to a user, we need to ensure that we have enough available licenses or else the code will throw an error. Check out my Introduction article on how to find out the number of available licenses.

I have added lots of comments to my code below and hence most of it is self-explanatory. Here is the complete script to bulk assign users
#-------------------------------------------------------
# Purpose        : To assign O365 CRM license to users
# Author         : Srihari Radhakrishnan
# Created On     : November 30 2015
#------------------------------------------------------- 


Connect-MsolService

#Declare the path for the users 
$UsersInputFilePath = Get-Content "D:\Users.txt" # Declare the file from which the user email addresses should be picked
$UsersOutputFilePath = "D:\UserLicenses.csv" # Declare the output file where results should be exported to
$Output = @() # Create an array to store the output results

#Add the license service options that need to be disabled when assigning a standard CRM license

# To find the additional service options that get enabled when assigning the CRM License, please use the code below to check
# Get-MsolAccountSku | Where-Object {$_.SkuPartNumber -eq "CRMSTANDARD"} | ForEach-Object {$_.ServiceStatus}

#Results
#-----------------------------------------------------------------------------
# MDM_SALES_COLLABORATION = Microsoft Dynamics Marketing Sales Collaboration
# NBPROFESSIONALFORCRM = Microsoft Social Engagement Professional
#-----------------------------------------------------------------------------

#Create the License Options with the Disabled Service Plans
$CRMLicense = New-MsolLicenseOptions -AccountSkuId testinc:CRMSTANDARD -DisabledPlans MDM_SALES_COLLABORATION, NBPROFESSIONALFORCRM

#Iterate through the users file and assign the licenses.
foreach($user in $UsersInputFilePath)
{
    #Set the CRM License to the user while disabling the additional services for that license
    Try
        {
            $ErrorActionPreference = "Stop" # Declare $ErrorActionPreference in order to catch the non-terminating error while assigning the licenses  
            Write-Host "Assigning License for " $user;
            Set-MsolUser -UserPrincipalName $user -UsageLocation "US"
            $LicenseOutcome  = Set-MsolUserLicense -UserPrincipalName $user -AddLicenses "testinc:CRMSTANDARD" -LicenseOptions $CRMLicense            
            if($?)
            {
                Write-Host "Success"
                $user | Add-Member -Type NoteProperty -Name Username -Value $user 
                $user | Add-Member -Type NoteProperty -Name Result -Value "Success"
                $Output+=$user
            }
        }
     Catch
        {
            Write-Host "Exception occured while trying to assign the license for the user " $user; # Write the custom error 
            Write-Host $Error[0].Exception; # Throw the actual error
            $user | Add-Member -Type NoteProperty -Name Username -Value $user 
            $user | Add-Member -Type NoteProperty -Name Result -Value "Failure"
            $user | Add-Member -Type NoteProperty -Name ErrorReason -Value $Error[0].Exception
            $Output+=$user
        }
     Finally
        {
            $ErrorActionPreference = "Continue"; # Reset $ErrorActionPreference variable so that the loop can continue
        }
    
}

$Input = Read-Host -Prompt "End of Process. Do you want to export the results? Type Y/N"
if($Input -eq "Y")
{  
  $Output | Select-Object UserName, Result, ErrorReason | Export-Csv $UsersOutputFilePath -NoTypeInformation
  Write-Host "CSV Exported to " $UsersOutputFilePath
}
else
{
  exit
}

Bulk Remove Licenses
The below code will be used to remove the CRM licenses
#-------------------------------------------------------
# Purpose        : To remove O365 CRM license from users
# Author         : Srihari Radhakrishnan
# Created On     : November 30 2015
#-------------------------------------------------------

Connect-MsolService

#Declare the path for the users 
$usersFile = Get-Content "D:\Users.txt" 

#Iterate through the users file and remove the licenses.
foreach($user in $usersFile)
{
     Try
        {
            $ErrorActionPreference = "Stop" # Declare $ErrorActionPreference in order to catch the non-terminating error while assigning the licenses  
            Write-Host "Removing License for " $user;
            $LicenseOutcome  = Set-MsolUserLicense -UserPrincipalName $user -RemoveLicenses "testinc:CRMSTANDARD"          
            if($?)
            {
                Write-Host "Success";
            }
        }
     Catch
        {
            Write-Host "Exception occured while trying to remove the license for the user " $user; # Write the custom error 
            Write-Host $Error[0].Exception; # Throw the actual error
        }
     Finally
        {
            $ErrorActionPreference = "Continue"; # Reset $ErrorActionPreference variable so that the loop can continue
        }
    
}

Read-Host -Prompt "Press any key to Exit"

Wednesday, January 27, 2016

Assign or Remove a CRM license to a user using PowerShell in O365

Assign a License
In order to assign a CRM license to a user, we know that one should login into the O365 Portal using an O365 admin account and then go to the list of users and then provide a CRM license manually to the user as shown below


Let's see how to do the same task using PowerShell. For those who are new to PowerShell in O365, please check out my introduction article Introduction to PowerShell using O365

Once you have the Azure PowerShell window open, the following command will easily assign the CRM license to a user
Connect-MsolService

Set-MsolUserLicense -UserPrincipalName "srihari@testinc.onmicrosoft.com" -AddLicenses "testinc:CRMSTANDARD"

License Options
The above code will assign all the license options under Dynamics CRM to the user. What is a license option?
In the below screenshot, a Dynamics CRM license has 3 License options:
  • Microsoft Dynamics Marketing Sales Collaboration
  • Microsoft Social Engagement Professional
  • Microsoft Dynamics CRM Online Professional


Well, what if we just want to assign ONLY the 3rd license option (Microsoft Dynamics CRM Online Professional) and not assign the other two?
In that case, our code needs to be updated as below.

First, we need to retrieve the license options schema name for CRM using the code below
Connect-MsolService

Get-MsolAccountSku | Where-Object {$_.SkuPartNumber -eq "CRMSTANDARD"} | ForEach-Object {$_.ServiceStatus}

Results:

Great, now that we know the schema names of the different license options under the CRM license, we will create a LicenseOption variable and add these license plans as "Diabled Plans" for that license
$CRMLicense = New-MsolLicenseOptions -AccountSkuId testinc:CRMSTANDARD -DisabledPlans MDM_SALES_COLLABORATION, NBPROFESSIONALFORCRM

Finally, the complete code to assign a license to a user with ONLY the CRM license option enabled would look like
Connect-MsolService

# To find the additional service options that get enabled when assigning the CRM License, please use the code below to check
# Get-MsolAccountSku | Where-Object {$_.SkuPartNumber -eq "CRMSTANDARD"} | ForEach-Object {$_.ServiceStatus}

#Results
#-----------------------------------------------------------------------------
# MDM_SALES_COLLABORATION = Microsoft Dynamics Marketing Sales Collaboration
# NBPROFESSIONALFORCRM = Microsoft Social Engagement Professional
#-----------------------------------------------------------------------------

#Create the License Options with the Disabled Service Plans
$CRMLicense = New-MsolLicenseOptions -AccountSkuId testinc:CRMSTANDARD -DisabledPlans MDM_SALES_COLLABORATION, NBPROFESSIONALFORCRM

Set-MsolUserLicense -UserPrincipalName "srihari@testinc.onmicrosoft.com" -AddLicenses "testinc:CRMSTANDARD" -LicenseOptions $CRMLicense

That's it! ..this is how it would now appear from the O365 UI


Removing a License
Removing a license is very straightforward as well. The following line of code will remove the license from a user
Set-MsolUserLicense -UserPrincipalName "srihari@testinc.onmicrosoft.com"-RemoveLicenses "testinc:CRMSTANDARD"

Introduction to Powershell using O365 and Dynamics CRM or Dynamics Marketing

This is a first in a series of articles that will explain how to use powershell to perform different tasks in O365 related to Dynamics CRM or Marketing.

First things first, you need to have the following pre-requisites before you can proceed:

  • An O365 Account
  • CRM Online that is part of the O365 tenant.
  • At minimum, "user administrator" privileges on O365 in order to be able to assign licenses to users in O365
  • Windows Azure Active Directory Module for Windows PowerShell. Note that this is different download from the normal powershell that comes installed on your server or laptop.


Now, let's get started.
  • Right click on "Windows Azure Active Directory Module for Windows PowerShell" icon from your taskbar and choose "Windows PowerShell ISE" or in case you do not have this on your taskbar, just launch powershell and type ISE.
  • This will launch the PowerShell ISE which is the scripting environment for PowerShell. Type Connect-MsolService in order to connect to O365. This will prompt you to key in your credentials and if you have sufficient permissions, you will be able to connect to O365.
  • Once connected, you can type in various powershell commands to perform different activities. 
The following code will connect to O365 and get a list of all the subscriptions that I have in my O365 tenant along with a count of the available and consumed license units. I will then export this data to a csv file

Connect-MsolService

Get-MsolAccountSku | Export-Csv D:\Srihari\O365\License\LicencesSplit.csv


The output will look something like this:

Tuesday, August 26, 2014

Setting up CRM Online with Exchange Online using Server Side Synchronization

I was trying to setup Server Side Synchronization using CRM Online and Exchange online as part of the Office 365 offerings. For some reason, I found the process to be somewhat confusing.

After several trial and error sessions, I have documented the below process that has always worked for me since. Hope this helps someone out there as well :)

1. First, create a CRM Online Trial Account
2. Then from the portal (https://portal.microsoftonline.com/), under Admin - Select Office 365

3. Choose Purchase Services and choose Trial for Office 365 Enterprise E3 trial or above.
4. Choose all the services and wait for approx. 10 mins for the services to get activated.

5. After purchasing the E3 Trial, we need to ensure that all the users in the organizations are also assigned to the purchased subscription. To do that, click on “Users and Groups” and select the users in your organization and then click on Edit


6. Then navigate to “Licenses” and then select all the subscriptions licenses and then click on Submit.

7. Wait until all your subscriptions in the command bar and under the Admin section get enabled as shown below:

8. Login into CRM. Click on Settings and go to System Settings. In the email tab, set everything to Server Side Synchronization and click on OK

9. Then click on Settings and choose Email Server Profiles

10. Open the currently Active Email Server Profile

11. Set the Auto-Discover to “No” and specify the Incoming and the Outgoing Server location as shown below (This should ideally work with “Auto Discover” set to “Yes” but for some reason it was not working for me unless I give the credentials as specified below).

12. Click on Mailboxes->Select all the mailboxes and then click on “Apply Default Email Settings”

13. Then click on “Test and Enable Mailboxes”. Ensure that the status for Incoming and Outgoing is successful.

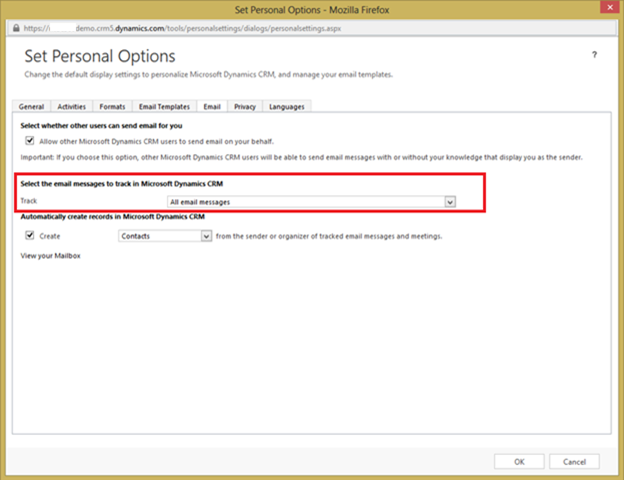
14. (Optional): Finally, go to the user’s Personal Options page. Set the Track emails options to track “All email messages”. That’s it.

Wednesday, June 4, 2014

Exception message: Table alias is not unique amongst all top-level table and join aliases CRM 2013

Recently I was trying to create a bunch of different views and I was using an existing view to "Save As" another view.
However, after publishing my new views, I would keep getting the error "Exception message: Table alias a_d8c7aa10e688e31180c200155d53e454 is not unique amongst all top-level table and join aliases" in the Event Viewer

When I looked into the FetchXml in SavedQueryBase table for the view that I just created, I would see that there were indeed two "linked entity" tags in the FetchXml.
Searching the internet, I found mostly 2 dirty work around's and 1 perfect work around (perfect for me) to resolve this issue.

Dirty Work Around

1. Export the Solution with the entity inside it. Open the customization.xml and remove the duplicate reference to the "linked entity" tag. Import the solution.
2. Get the FetchXml for the view from the SavedQueryBase table and remove the duplicate reference to the "linked entity" tag. Update the FetchXml back into the SavedQueryBase table for that view and then Publish the Entity from CRM.

Perfect Work Around (Perfect for my situation)

I just happened to accidentally read the comments left by one of the users in one of the blogs while researching a fix for this issue. I can't remember the blog or the commenter but all thanks to him for the issue resolution.

Root Cause
This is a bug in the product and apparently there was a fix released for this in CRM 2011 UR 12 but no fix has been released so far for CRM 2013 until UR 2.
The Root Cause is that if you already have columns from a "linked entity" in your "Entity Advanced Find View", any further views that you create that reference columns from a linked entity will throw an error.

Resolution
1. Go to the Entity Customization
2. Click on Views
3. Open the Entity Advanced Find View (Ex. Contact Advanced Find View)
4. Remove any references to columns that may have been added from another entity. i.e these fields do no exist inside the current entity.
5. Save and Publish the entity.

Thats it! Now, I was able to create all my views as usual without getting any errors. Hope this helps someone.

Thursday, February 20, 2014

Retrieve CRM Form Metadata Xml

The below method helps us to retrieve the FormXml of a CRM Entity
        private string GetFormXml(string websiteName, string entityName, IOrganizationService service)
        {
            string formXml = "";

            try
            {
                RetrieveEntityRequest mdRequest = new RetrieveEntityRequest()
                {
                    EntityFilters = EntityFilters.Attributes,
                    LogicalName = entityName,
                    RetrieveAsIfPublished = true
                };
                // Execute the request
                RetrieveEntityResponse entityResponse = (RetrieveEntityResponse)service.Execute(mdRequest);
                //EntityMetadata entityData = entityResponse.EntityMetadata;y

                var entityTypeCode = entityResponse.EntityMetadata.ObjectTypeCode.Value;

                QueryExpression query = new QueryExpression("systemform");
                query.ColumnSet = new ColumnSet("formxml");
                query.Criteria.AddCondition(new ConditionExpression("name", ConditionOperator.Equal, websiteName));
                query.Criteria.AddCondition(new ConditionExpression("objecttypecode", ConditionOperator.Equal, entityTypeCode));

                RetrieveMultipleRequest retrieveRequest = new RetrieveMultipleRequest();
                retrieveRequest.Query = query;

                var results = (RetrieveMultipleResponse)service.Execute(retrieveRequest);
                formXml = results.EntityCollection.Entities[0].Attributes["formxml"].ToString();

                return formXml;

            }            
            catch (FaultException ex)
            {
                throw new FaultException("Error occured while instantiating the CRM Service " + ex.ToString());
            }
            
        }

Wednesday, February 19, 2014

Retrieving the optionset label

The below code helps us to retrieve the label of the option set. Please note that the "optionValue" is the integer value of the label that you want to retrieve.
        public static string GetOptionSetLabel(string entityName, string attributeName, int optionValue, IOrganizationService service)
        {
            try
            {
                RetrieveAttributeRequest retrieveAttributeRequest =
                            new RetrieveAttributeRequest
                            {
                                EntityLogicalName = entityName,
                                LogicalName = attributeName,
                                RetrieveAsIfPublished = true
                            };

                // Execute the request.
                RetrieveAttributeResponse retrieveAttributeResponse =
                    (RetrieveAttributeResponse)service.Execute(retrieveAttributeRequest);

                // Access the retrieved attribute.
                PicklistAttributeMetadata retrievedPicklistAttributeMetadata = (PicklistAttributeMetadata)retrieveAttributeResponse.AttributeMetadata;

                // Get the current options list for the retrieved attribute.
                OptionMetadata[] optionList = retrievedPicklistAttributeMetadata.OptionSet.Options.ToArray();

                foreach (OptionMetadata option in optionList)
                {
                    if (option.Value == optionValue)
                    {
                        return option.Label.UserLocalizedLabel.Label;
                    }
                }
            }
            catch(Exception ex)
            {
                WriteErrorLog(entityName, "Error while retrieving the optionset labels " + ex.ToString(), service);
            }

            return String.Empty;
        }

Retrieve the image saved in an Entity Record

The below method can be used to retrieve the image that is stored in an entity record.

        public static byte[] GetEntityImage(string entityName, Guid entityId, IOrganizationService service)
        {
            try
            {
                QueryExpression query = new QueryExpression(entityName);
                query.ColumnSet = new ColumnSet("entityimage");
                query.Criteria = new FilterExpression(LogicalOperator.And);
                query.Criteria.AddCondition(entityName + "id", ConditionOperator.Equal, entityId);
                EntityCollection collection = service.RetrieveMultiple(query);
                if (collection.Entities[0].Contains("entityimage"))
                {
                    return collection.Entities[0]["entityimage"] as byte[];
                }

            }
            catch (Exception ex)
            {
                //WriteErrorLog(entityName, ex.ToString(), service);
            }
            return null;
        }

Friday, June 7, 2013

CRM 2011 - Auto assign a role to user when a New User is created/Updated

We had a recent requirement where we needed to assign a specific role to a user on user create using a plugin. The below is the complete source code of the plugin that had been written.

using System;
using System.Collections.Generic;
using System.Linq;
using System.Text;
using Microsoft.Xrm.Sdk;
using Microsoft.Xrm.Sdk.Metadata;
using Microsoft.Crm.Sdk;
using Microsoft.Crm.Sdk.Messages;
using Microsoft.Xrm.Sdk.Query;
using Microsoft.Xrm.Sdk.Client;
using Microsoft.Xrm.Sdk.Messages; 


namespace AssignDefaultRole
{
    public class AssignRoleCS : IPlugin
    {        
        Guid systemUserGuid = Guid.Empty;
        EntityReference buLookup;
        Guid buid = Guid.Empty;
        EntityCollection userRolesColl = null;
        Entity entitySystemUser;
        string securityRole = string.Empty;

        public void Execute(IServiceProvider serviceProvider)
        {
            IPluginExecutionContext context = (IPluginExecutionContext)serviceProvider.GetService(typeof(IPluginExecutionContext));
            IOrganizationServiceFactory factory = (IOrganizationServiceFactory)serviceProvider.GetService(typeof(IOrganizationServiceFactory));
            IOrganizationService service = factory.CreateOrganizationService(context.UserId);

            
            if (context.InputParameters.Contains("Target") && context.InputParameters["Target"] is Entity)
            {
                Entity primaryEntity = (Entity)context.InputParameters["Target"]; // systemuser
                if (primaryEntity.LogicalName != "systemuser" && context.MessageName.ToLower()!="update")
                {
                    return;
                }
                else if (context.PostEntityImages.Contains("PostUserImage") && context.PostEntityImages["PostUserImage"] is Entity)
                {
                    entitySystemUser = (Entity)context.PostEntityImages["PostUserImage"];
                    buLookup = (EntityReference)entitySystemUser.Attributes["businessunitid"];
                    buid = buLookup.Id;                   
                    systemUserGuid = new Guid(entitySystemUser.Attributes["systemuserid"].ToString());

                    //Check if the user already has the Default Role
                    bool userHasRole = CheckRoleExists(service);

                    if (!userHasRole)//user does not have the Default role
                    {
                        //Get the Default Role
                        Guid DefaultSecurityRoleId = GetSecurityRoleId(service, buid, securityRole);

                        //Assign the role to the user.
                        AssignSecurityRole(systemUserGuid, DefaultSecurityRoleId, service);
                    }
                }
            }          

          
        }

        /// 
        /// Check if the user already has the default role assigned.
        ///   
        private bool CheckRoleExists(IOrganizationService service)
        {
            try
            {
                //UserGuid = context.InitiatingUserId;
                securityRole = "Default Privileges Role";
                QueryExpression Query = new QueryExpression()
                {
                    LinkEntities = 
                    {
                        new LinkEntity
                        {
                            LinkFromEntityName = "role",
                            LinkFromAttributeName = "roleid",
                            LinkToEntityName = "systemuserroles",
                            LinkToAttributeName = "roleid",
                            LinkCriteria = new FilterExpression
                            {
                                FilterOperator = LogicalOperator.And,
                                Conditions = 
                                {
                                    new ConditionExpression
                                    {
                                        AttributeName = "systemuserid",
                                        Operator = ConditionOperator.Equal,
                                        Values = { systemUserGuid }
                                    }
                                }
                            }
                        }
                    }
                };

                Query.ColumnSet = new ColumnSet(true);
                Query.EntityName = "role";

                userRolesColl = service.RetrieveMultiple(Query);
               
                //If the role exists, return true
                if (userRolesColl.Entities.Count > 0 && userRolesColl.Entities[0].Attributes["name"].ToString() == securityRole)
                {
                    return true;
                }

                return false;

            }
            catch (System.Web.Services.Protocols.SoapException ex)
            {
                throw new InvalidPluginExecutionException(ex.Detail.InnerText);
            }
            catch (Exception ex)
            {
                throw new InvalidPluginExecutionException(ex.Message);
            }
        }


        /// 
        /// Get the Role ID of the Default CRM 2011 role
        ///      
        private Guid GetSecurityRoleId(IOrganizationService service,Guid businessUnitID,string roleName)
        {
            Guid SecurityRoleId = Guid.Empty;
            EntityCollection ec = new EntityCollection();

            try
            {
                QueryExpression qe = new QueryExpression("role");
                ColumnSet set = new ColumnSet(new string[] { "roleid" });

                qe.ColumnSet = set;

                ConditionExpression cond = new ConditionExpression("name", ConditionOperator.Equal, roleName);
                ConditionExpression cond2 = new ConditionExpression("businessunitid", ConditionOperator.Equal, businessUnitID);
                FilterExpression fl = new FilterExpression(LogicalOperator.And);
                fl.Conditions.Add(cond);
                fl.Conditions.Add(cond2);

                qe.Criteria.AddFilter(fl);

                ec = service.RetrieveMultiple(qe);

                if (ec.Entities.Count > 0)
                {
                    SecurityRoleId = new Guid(ec.Entities[0].Attributes["roleid"].ToString());
                }
            }

            catch (System.Web.Services.Protocols.SoapException soapex)
            {
                throw new InvalidPluginExecutionException(soapex.Detail.InnerText);
            }
            catch (Exception ex)
            {
                throw ex;
            }

            return SecurityRoleId;
        }


        /// 
        /// Assign the Default CRM 2011 Role to the user
        /// 
        public void AssignSecurityRole(Guid userID, Guid securityRoleID, IOrganizationService service)
        {
            try
            {
                service.Associate(
                               "role",
                               securityRoleID,
                               new Relationship("systemuserroles_association"),
                               new EntityReferenceCollection() { new EntityReference("systemuser", userID) });
            }
            catch (System.Web.Services.Protocols.SoapException soapex)
            {
                throw new InvalidPluginExecutionException(soapex.Detail.InnerText);
            }
            catch (Exception ex)
            {
                throw ex;
            }
        }

        
    }
}


The above code first checks if the user has any role assigned. If not, it goes ahead and assigns the Default Security Role to the user.

After building the plugin, I had it registered in the following manner:

Notice that for both "Create" and "Update" events, I have registered just the one step displayed above

I am not exactly sure why, but I noticed that even if I register my plugin for the Create event, the plugin also automatically fires another update event. So, I have just registered my plugin for the update event and this works for both the create and the update.

Another issue I was facing was when I tried to register this plugin in a synchronous manner. I would keep getting the error message "Error: usersettings With Id = 92bd1403-6ace-e211-a1c4-0800279f0ce3 Does Not Exist" in the trace logs.

In order to rid myself of the error and in order to ensure that the plugin only fires once per transaction, I have registered it ONLY for the "Update" message and in "Asynchronous" execution mode.

Cheers!

Wednesday, March 27, 2013

CRM 2011 - Instantiating the CRM Service and Impersonating it

 The below code can be used to create the CRM service in CRM 2011 and also to impersonate the CRM service

public static IOrganizationService Service() 
{
    ClientCredentials Credentials = new ClientCredentials(); 
    Credentials.Windows.ClientCredential.UserName ="Impersonating User ID Name"; 
    Credentials.Windows.ClientCredential.Password ="Impersonating User ID password"; 

    //Update the below URL as per your environment
    Uri OrganizationUri = new Uri("http://serverName/OrganizationName/XRMServices/2011/Organization.svc"); 
    Uri HomeRealmUri = null; 

    //Get the CRM Service from the CRM Service Proxy
    using (OrganizationServiceProxy serviceProxy = new OrganizationServiceProxy(OrganizationUri, HomeRealmUri, Credentials, null)) 
    {
        IOrganizationService service = (IOrganizationService)serviceProxy; 
        return service; 
    }
}

Friday, November 18, 2011

Learning ODATA Queries

Hi,
The below link is one of the best blogs I have come across for learning ODATA queries

http://crmscape.blogspot.com/2011/03/crm-2011-odata-json-and-crm-forms.html

Please check it out.

Thursday, October 6, 2011

Publishers and Changing a Custom Entity Prefix in MS CRM 2011

I think this is a great new feature in CRM 2011. Please refer to the following article that describes how to do this:
http://support.microsoft.com/kb/2500602

Tuesday, October 4, 2011

Changing the Font Color of a Read-Only Field in MS CRM 2011

I recently got a request to change the font color of certain fields in CRM 2011. I used the below code to achieve this:

function setColor() {
    if (document.getElementById("new_name") != null) {
        //Add the below line if the field is disabled
        document.getElementById("new_name").disabled = false;
        //The below line changes the font color
        document.getElementById("new_name").style.color = "red";
    }
}
Note: Accessing the DOM as shown above is totally unsupported. I had to use the above method since I was not able to find any supported way of achieving this functionality

Thursday, September 1, 2011

Enabling JScript/JavaScript in Bulk Edit CRM 2011

I recently came across a situation where I had to use Jscript while Bulk Editing the records in CRM 2011. As we all know, this is not possible out of the box but thanks to Michael Höhne (http://www.stunnware.com/crm2/topic.aspx?id=BulkEdit) and Microsoft for providing with the KB article (http://support.microsoft.com/kb/949941)

Here is what we need to do:

1. Export the entity as a solution for which JScript needs to be enabled during Bulk Edit.
2. Open the customization.xml
3. Add BehaviorInBulkEditForm="Enabled" to the event handlers as shown below
 
<
event name="onchange" application="false" active="false" attribute="new_day" BehaviorInBulkEditForm="Enabled"
>

<
event name="onsave" application="false" active="false" BehaviorInBulkEditForm="Enabled"
>

4. Save and Import the solution. Your JScript code should now be triggered!

 --Srihari

Wednesday, July 6, 2011

MS CRM 2011 - Cool New Data Import Wizard

Yesterday, while trying to import some data into my dev system, I stumbled upon a cool new feature built inside the MS CRM 2011 Import Wizard - The ability to create an "Entity" and all it's attributes right during the import.
This means that I no longer have to create an entitty and then import the data into it. I can do this in one shot. Thats an AMAZING feature considering I am doing a whole bunch of mock-ups  in order to present to the client :-)

Let us walk through the steps below:

1. I have an excel sheet with some data in the following format. Let me call this "TIMETABLE"


July
Accounts
Management A/c
5
Corporate Financial reporting
Project Planning & capital budgeting
6
Corporate Restructuring
Project Planning & capital budgeting
7
Corporate Restructuring
Project Planning & capital budgeting
8
Corporate Restructuring
Project Planning & capital budgeting
9
Corporate Restructuring
Project Planning & capital budgeting
10
Consolidated Fian Stats
Project Planning & capital budgeting
11
Consolidated Fian Stats
Project Planning & capital budgeting
12
Consolidated Fian Stats
Project Planning & capital budgeting
13
Consolidated Fian Stats
Project Planning & capital budgeting
14
Consolidated Fian Stats
Leasing decisions
15
Consolidated Fian Stats
Leasing decisions
16
Consolidated Fian Stats
Leasing decisions
17
Consolidated Fian Stats
Dividend decisions
18
Consolidated Fian Stats
Dividend decisions
19
Consolidated Fian Stats
Indian capital market
20
Consolidated Fian Stats
Indian capital market
21
Consolidated Fian Stats
Indian capital market
22
Consolidated Fian Stats
Indian capital market
23
Consolidated Fian Stats
Indian capital market
24
Consolidated Fian Stats
Security Analysis
25
Consolidated Fian Stats
Security Analysis
26
Consolidated Fian Stats
Security Analysis
27
Consolidated Fian Stats
Portfolio theory
28
Consolidated Fian Stats
Portfolio theory
29
A/c & reporting of financial instruments
Portfolio theory
30
Revision
Revision
31
Revision
Revision


Now, let's use the Data Import Wizard to create and Import the Time-Table entity into CRM 2011.

2. Open CRM 2011. Click on Tools -->Import Data
3. Click on "Browse" and choose the above excel sheet which was saved in ".csv" format.

4. Click on Next.
5. Verify that the file is uploaded and click on Next again.
6. Choose the Default Automatic Mapping and click on Next

7. Now this is where the real fun begins. Choose "Create New" in the Map Record Types Screen.


8. Specify a name for this entity. In this case I call is Time Table. Click on Next


9. As you can see below, the wizard automatically recognizes the columns from the excel sheet and is asking us to specify the field names in CRM.
10. Since there are no fields yet created, I selected "Create New Field" from the dropdown list.

11. Specify the Field Name and also choose the data type for the field and then click on OK.

12. Perform the same for all the other fields that you want and then finally, click Next.
13. Verify the "Review  Mapping Summary" and click on Next.

14. Specify if you want to allow duplicates and also choose the default owner for the Imported Records. Finally click on Submit.

15. CRM will start creating the entity and the attributes for you as shown below

16. If everything is successful, it should display the screen as shown below.

17. The import job should complete successfully and after that we just need to go to the customization and customize the form and the views as per our requirement.

18. Publish the entity and voila! - we have a new Time Table entity with all the data in it.


I am going to love this feature as creating demos for customers is going to be a lot more easier from now on.

Thanks!